You know what’s funny? I bought my first thermal camera because I was absolutely convinced there was a water leak somewhere in my bathroom wall. I could hear this faint dripping sound every time someone upstairs used their shower, but three different plumbers told me everything looked fine. They quoted me anywhere from $2,000 to $5,000 to open up the wall “just to check.”
I spent $300 on a basic thermal camera instead. Took me about 30 seconds to find the problem – and it wasn’t even in the wall I thought it was. Turned out the leak was in a completely different pipe, one I could access through a small panel in the hallway closet. Fixed it myself for $45 in parts.
That was eight years ago. Since then, I’ve tested probably 40 different thermal cameras, from cheap $80 Amazon specials to professional $4,000 units. I’ve used them to find everything from electrical problems that could’ve started fires, to figuring out why my energy bills were so high, to helping my brother-in-law prove that his contractor didn’t actually install the insulation he paid for.
The thing is, most people make this way more complicated than it needs to be. So let me share what actually matters, based on what I’ve learned from using these things in real situations.
The One Thing You Need to Understand First
Here’s the deal: thermal cameras don’t see through walls. I still get this question all the time. What they do is show you temperature differences on surfaces. So when you scan a wall and see a cold spot, that’s not you seeing water inside the wall – that’s you seeing where the surface temperature is different because there’s water cooling it down from behind.
I mention this because it completely changes how you think about using these cameras. You’re not looking for X-ray vision. You’re looking for clues – temperature patterns that tell you something interesting is happening. Once I understood that, I got way better at actually finding problems instead of just staring at colorful images wondering what they meant.

What Can You Actually Do With One of These Things?
Before we talk about which camera to buy, let me tell you about some real situations where I’ve used mine. This’ll give you a better sense of whether you actually need one.
Last winter, my neighbor Dave was convinced his heating system was broken. His upstairs bedroom was freezing while the rest of the house was fine. HVAC guy came out, checked everything, said the system was working perfectly. Charged him $150 for the visit. I brought my thermal camera over, and within five minutes we found the problem – the duct running to that bedroom had a huge gap where it connected to the main line. All the warm air was just dumping into his attic instead of the bedroom. He fixed it himself with some duct tape and mastic sealant. Probably saved him another $500 in HVAC bills.
Air leaks around windows and doors show up clearly on thermal imaging. Find exactly where your heating or cooling is escaping. According to the U.S. Department of Energy, air sealing can save homeowners up to 20% on heating and cooling costs. One homeowner I know found gaps around his attic hatch that were costing him $40/month in wasted energy.
Or here’s another one: my friend Sarah bought an older house. The seller swore up and down that they’d just had the whole place re-insulated. She hired a home inspector, and he said everything looked good from what he could see. But something felt off to her – certain rooms were just noticeably colder than others. I scanned her attic with my camera, and yeah, there was insulation… but it was the thinnest layer I’d ever seen, maybe 2 inches in most places. The previous owner had technically told the truth – they did add insulation – but they’d done the absolute bare minimum. She went back to the seller with the thermal images and got $3,000 knocked off the purchase price.
For homeowners, that’s really what these cameras are best at – catching problems early, verifying that work was actually done, and avoiding expensive surprises. You’re not going to be doing detailed engineering analysis. You’re going to be pointing it at stuff and seeing if anything looks weird.
For professionals, it’s a different story. I know electricians who’ve completely changed how they work since getting thermal cameras. Instead of spending an hour troubleshooting a panel, they can scan it in 30 seconds and immediately see which breaker is running hot. HVAC techs use them to find refrigerant leaks that would otherwise take forever to track down. Home inspectors charge an extra $200-300 for thermal imaging, and it usually only takes them an extra 15 minutes per house.
The Stuff That Actually Matters (And the Stuff That Doesn’t)
Alright, so you’re convinced you want one. Now comes the confusing part – there are like a million different specifications, and manufacturers love to throw around technical terms that make it hard to compare anything.
Let me simplify this based on what I’ve actually found makes a difference in real use.

Resolution: Higher Numbers Aren’t Always Better
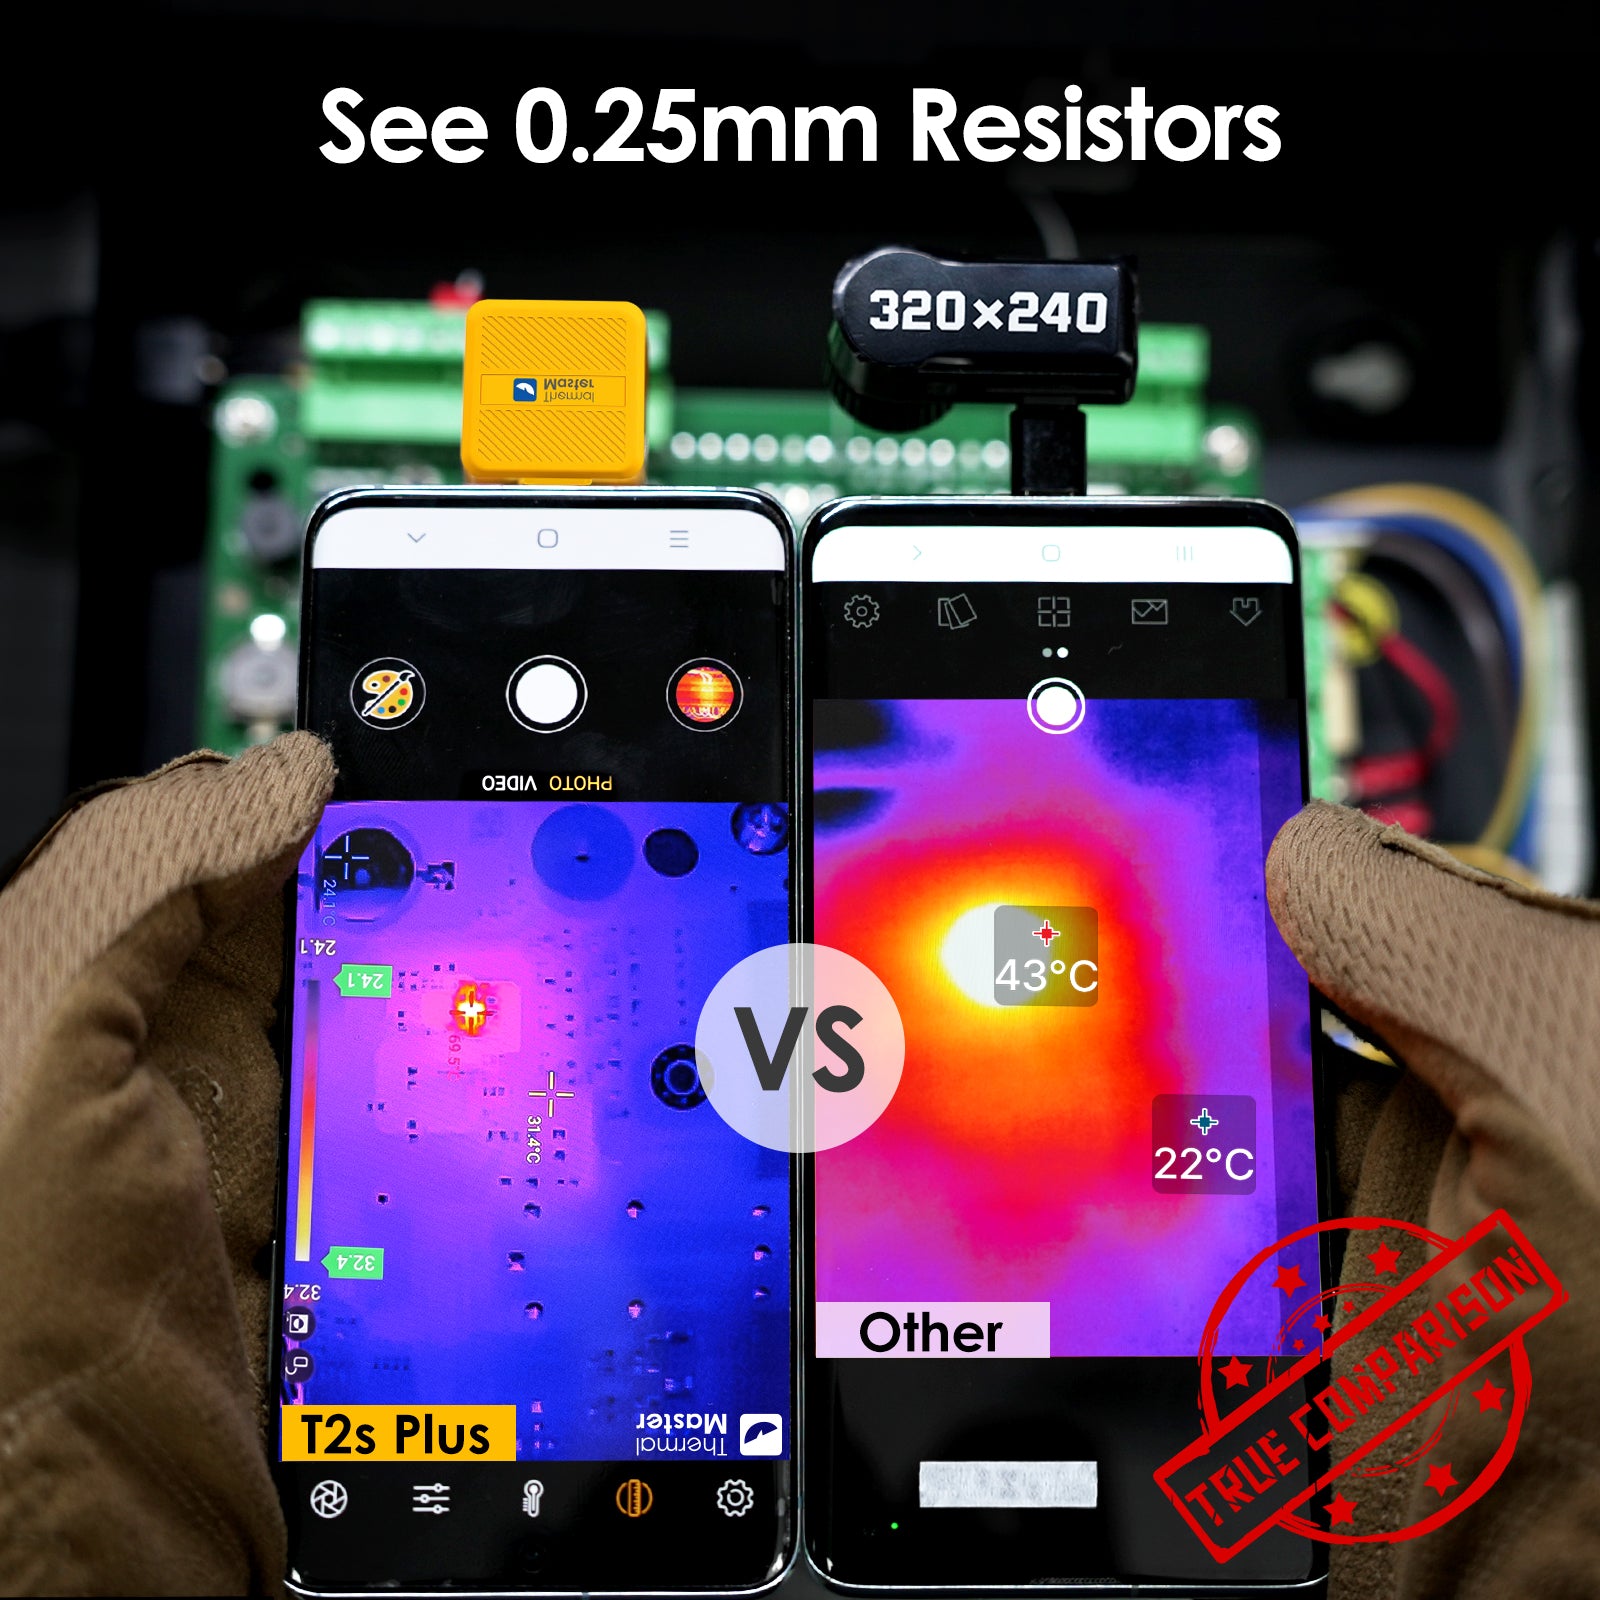
This is probably the most misunderstood thing about thermal cameras. You’ll see cameras advertised with 160×120, 256×192, 320×240, or even 640×480 resolution. And yeah, higher is generally better. But here’s the thing – it’s not as simple as “buy the highest resolution you can afford.”
I’ve got a 160×120 camera that I paid $250 for. It’s absolutely fine for finding water leaks, checking insulation, scanning electrical panels, and all the basic home inspection stuff. The image isn’t as sharp as my fancier cameras, but I can still clearly see what I need to see.
Then I’ve got a 320×240 camera that cost about $800. The images are definitely prettier. Details are sharper. But if I’m being honest with you, for probably 80% of what I do, the cheaper camera would’ve been fine.
Where the higher resolution really matters is documentation. If you’re a professional who needs to show clients clear, detailed images, or if you need to capture temperature data from far away, then yeah, spring for the higher resolution. But if you’re a homeowner who just wants to check your own house, you can save yourself several hundred dollars and get something perfectly adequate.
The one thing I will say is don’t go below 160×120. I tested some of those ultra-cheap cameras with like 32×32 or 60×60 resolution, and they’re basically useless. You’re just seeing blurry blobs of color. They’re more “hot spot detectors” than actual thermal cameras.
Temperature Range: Most People Need Way Less Than They Think
Every thermal camera has a range of temperatures it can measure. You’ll see cameras that go from -20°C to 150°C, or -20°C to 400°C, or even up to 1200°C for industrial models.
Here’s what I’ve learned: unless you’re doing something really specialized, you don’t need those extreme ranges. For home inspections, electrical work, HVAC diagnostics, even automotive work – a range of -20°C to 400°C covers pretty much everything you’ll ever encounter.
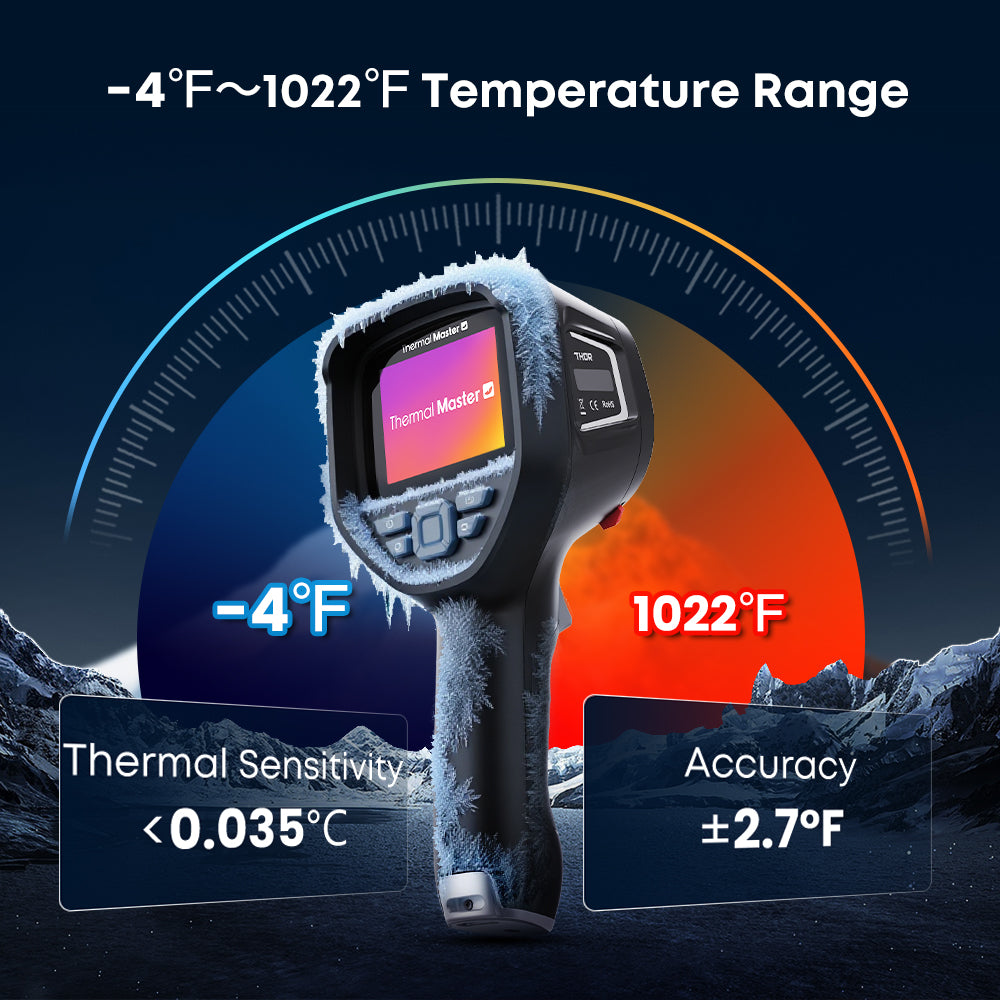
I made the mistake early on of buying a camera that went up to 650°C because I thought “hey, more is better, right?” Never once have I needed to measure anything above 300°C. I basically paid extra for a specification I’ve never used.
The one exception is if you work with industrial equipment – furnaces, kilns, that sort of thing. Then yeah, you need the high-temperature capability. But for everyone else, it’s just marketing.
Thermal Sensitivity: This One Actually Matters
Okay, this is where I’m going to get slightly technical for a minute, but it’s important. Thermal sensitivity is measured as NETD (Noise Equivalent Temperature Difference), and it tells you the smallest temperature difference the camera can detect.
Lower numbers are better. A camera with 50mK (that’s 0.05°C) sensitivity can pick up tiny temperature variations. One with 150mK will only catch bigger differences.
Why does this matter? Because problems usually start small. An electrical connection that’s starting to fail will be slightly warm before it gets dangerously hot. A water leak will create a subtle cool spot before it becomes obvious water damage. A camera with good sensitivity lets you catch these things early.
That said, you don’t need to obsess over this. Anything under 100mK is really good. Between 100-150mK is fine for most uses. Above 150mK, and you might miss some subtle issues.
My main camera has 50mK sensitivity, and I love it for detailed inspection work. But I’ve got a backup camera with 100mK, and honestly, for quick checks around the house, I barely notice the difference.
Phone Cameras vs Handheld: The Decision Nobody Talks About Honestly
This is where I’m going to tell you something that might surprise you: for most people reading this, a smartphone thermal camera is probably the better choice.
I know that sounds weird coming from someone who owns several thousand dollars worth of thermal cameras. But hear me out.

The smartphone cameras that attach to your phone – like the Thermal Master P2 or P3 – have gotten really, really good. I mean, genuinely good, not just “good for the price.” I use my P3 constantly, even though I own much more expensive handheld units, because it’s just so damn convenient.
Here’s a real example: Last week, I was at my mom’s house for dinner. She mentioned that one of her outlets felt warm when she unplugged something. Now, I wasn’t planning to do any electrical work that day, so I didn’t have my big thermal camera with me. But I had my phone, and my P3 is always in my pocket. Took it out, plugged it in, scanned the outlet. Turns out the outlet was fine – it was the plug on her space heater that was partially melted and shorting out. The whole “inspection” took maybe two minutes, and it potentially prevented a fire.
Overloaded circuits, loose connections, and failing breakers all generate excess heat. A quick thermal scan of your electrical panel can reveal dangerous hot spots that could cause a fire. The Canada National Fire Protection Association reports that electrical failures are a leading cause of home fires. In fact, insurance companies are starting to recommend thermal inspections for older homes.
That’s the beauty of the phone-based cameras. They’re so portable that you’ll actually have them with you. And because they use your phone’s screen and processor, manufacturers can put more of the cost into the actual thermal sensor instead of building in a screen and computer.
The downsides? Yeah, they exist. The resolution tops out around 256×192 for most models (though the P3 hits 320×240). They drain your phone battery. The image can be a bit laggy compared to dedicated handhelds. And if you work in harsh conditions – like crawling around in attics or working outside in the rain – your phone might not be the most durable thing to be dragging around.
The handheld cameras are tougher, have better battery life, and usually have slightly higher specs. But they’re also 2-3 times more expensive, and you have to actually remember to bring them with you.
So here’s how I think about it: Are you going to use this thing every single day for professional work? Will you be generating reports for clients? Are you working in conditions where you might drop or damage your phone? If yes to any of these, get a handheld.
Otherwise, get a good phone-based camera and save yourself a pile of money. You can always upgrade later if you find yourself wanting more.
The Mistakes I Made (So You Don’t Have To)
I’ve wasted a fair bit of money figuring out what works and what doesn’t. Let me save you some trouble.
Mistake Number One: Buying the Cheapest Thing on Amazon
My second thermal camera was an $85 special from some brand I’d never heard of. The reviews looked good – lots of five-star ratings. Turns out those were probably fake, because the camera was absolute garbage. The resolution was so low I literally could not tell what I was looking at most of the time. The temperature readings were wildly inconsistent – I’d point it at the same spot twice and get readings that differed by 10-15 degrees. It broke after three months.
Look, I get wanting to save money. But there’s a minimum threshold where thermal cameras actually become useful, and it’s around $200-250. Below that, you’re just buying an expensive toy that’ll frustrate you and not actually help you find problems.
Mistake Number Two: Buying Way More Camera Than I Needed
On the flip side, I also bought a $2,800 professional camera early on because I thought “well, if I’m going to do this seriously, I should get the best.” It had 640×480 resolution, could measure up to 1200°C, had advanced features I didn’t understand… and you know how often I used most of those features? Never.
For the kind of work I do – home inspections, electrical checks, helping friends with their houses – my $600 camera does everything the $2,800 one does. The expensive camera takes prettier pictures, sure. But it didn’t help me find any more problems or work any faster. It just cost more and made me nervous about bringing it into dirty crawlspaces.
Mistake Number Three: Not Checking Phone Compatibility
This one’s simple but important. I bought a thermal camera attachment for my phone without carefully checking the specs. It was USB-C, which I thought meant it would work with my Android. Turns out it required a specific app that wasn’t compatible with my phone model. Had to return it, wait for the refund, then order the right one. Lost two weeks where I could’ve been using it.
Just double-check: P2 works with Android only. P2 Pro works with both iPhone and Android. P1 and P3 work with everything – iOS, Android, even Windows computers. Don’t assume.
Mistake Number Four: Forgetting About the Learning Curve
Here’s something nobody tells you: thermal cameras aren’t hard to use, but they do require you to understand what you’re looking at. The first few times I used one, I’d see temperature differences and not know if they meant something or not.
For example, it’s normal for south-facing walls to be warmer than north-facing walls if the sun’s been shining on them. It’s normal for areas near windows to be slightly cooler. It’s normal for electrical panels to show some variation in temperature between circuits that are loaded differently.
What’s not normal is a random cold spot in the middle of a ceiling, a hot spot on a wall outlet, or insulation that shows completely different temperatures in different areas when it should all be the same.
Give yourself a few hours of just scanning random stuff around your house to get familiar with what “normal” looks like. Once you’ve got that baseline, the weird stuff becomes much more obvious.
Real Scenarios: What Should You Actually Buy?
Alright, enough theory. Let me give you some practical recommendations based on real situations.
If You’re a Homeowner Who Just Wants Peace of Mind
You probably want something like the Thermal Master P2 or P2 Pro. They’re in the $300-400 range, which is enough to be actually useful but not so much that you’ll regret buying it if you only use it occasionally.
I’d lean toward the P2 Pro if you have an iPhone, since it works with both iOS and Android – gives you flexibility if you switch phones later. If you’re Android-only, the regular P2 saves you a bit of money.
The resolution on these (256×192) is totally adequate for finding leaks, checking insulation, spotting electrical problems, all that stuff. They’re small enough that you’ll actually carry them around instead of leaving them in a drawer somewhere.
One thing to keep in mind: these will drain your phone battery. If you’re planning to use it for extended periods, bring a power bank or keep your phone charger handy.
If You’re a Weekend Warrior DIYer
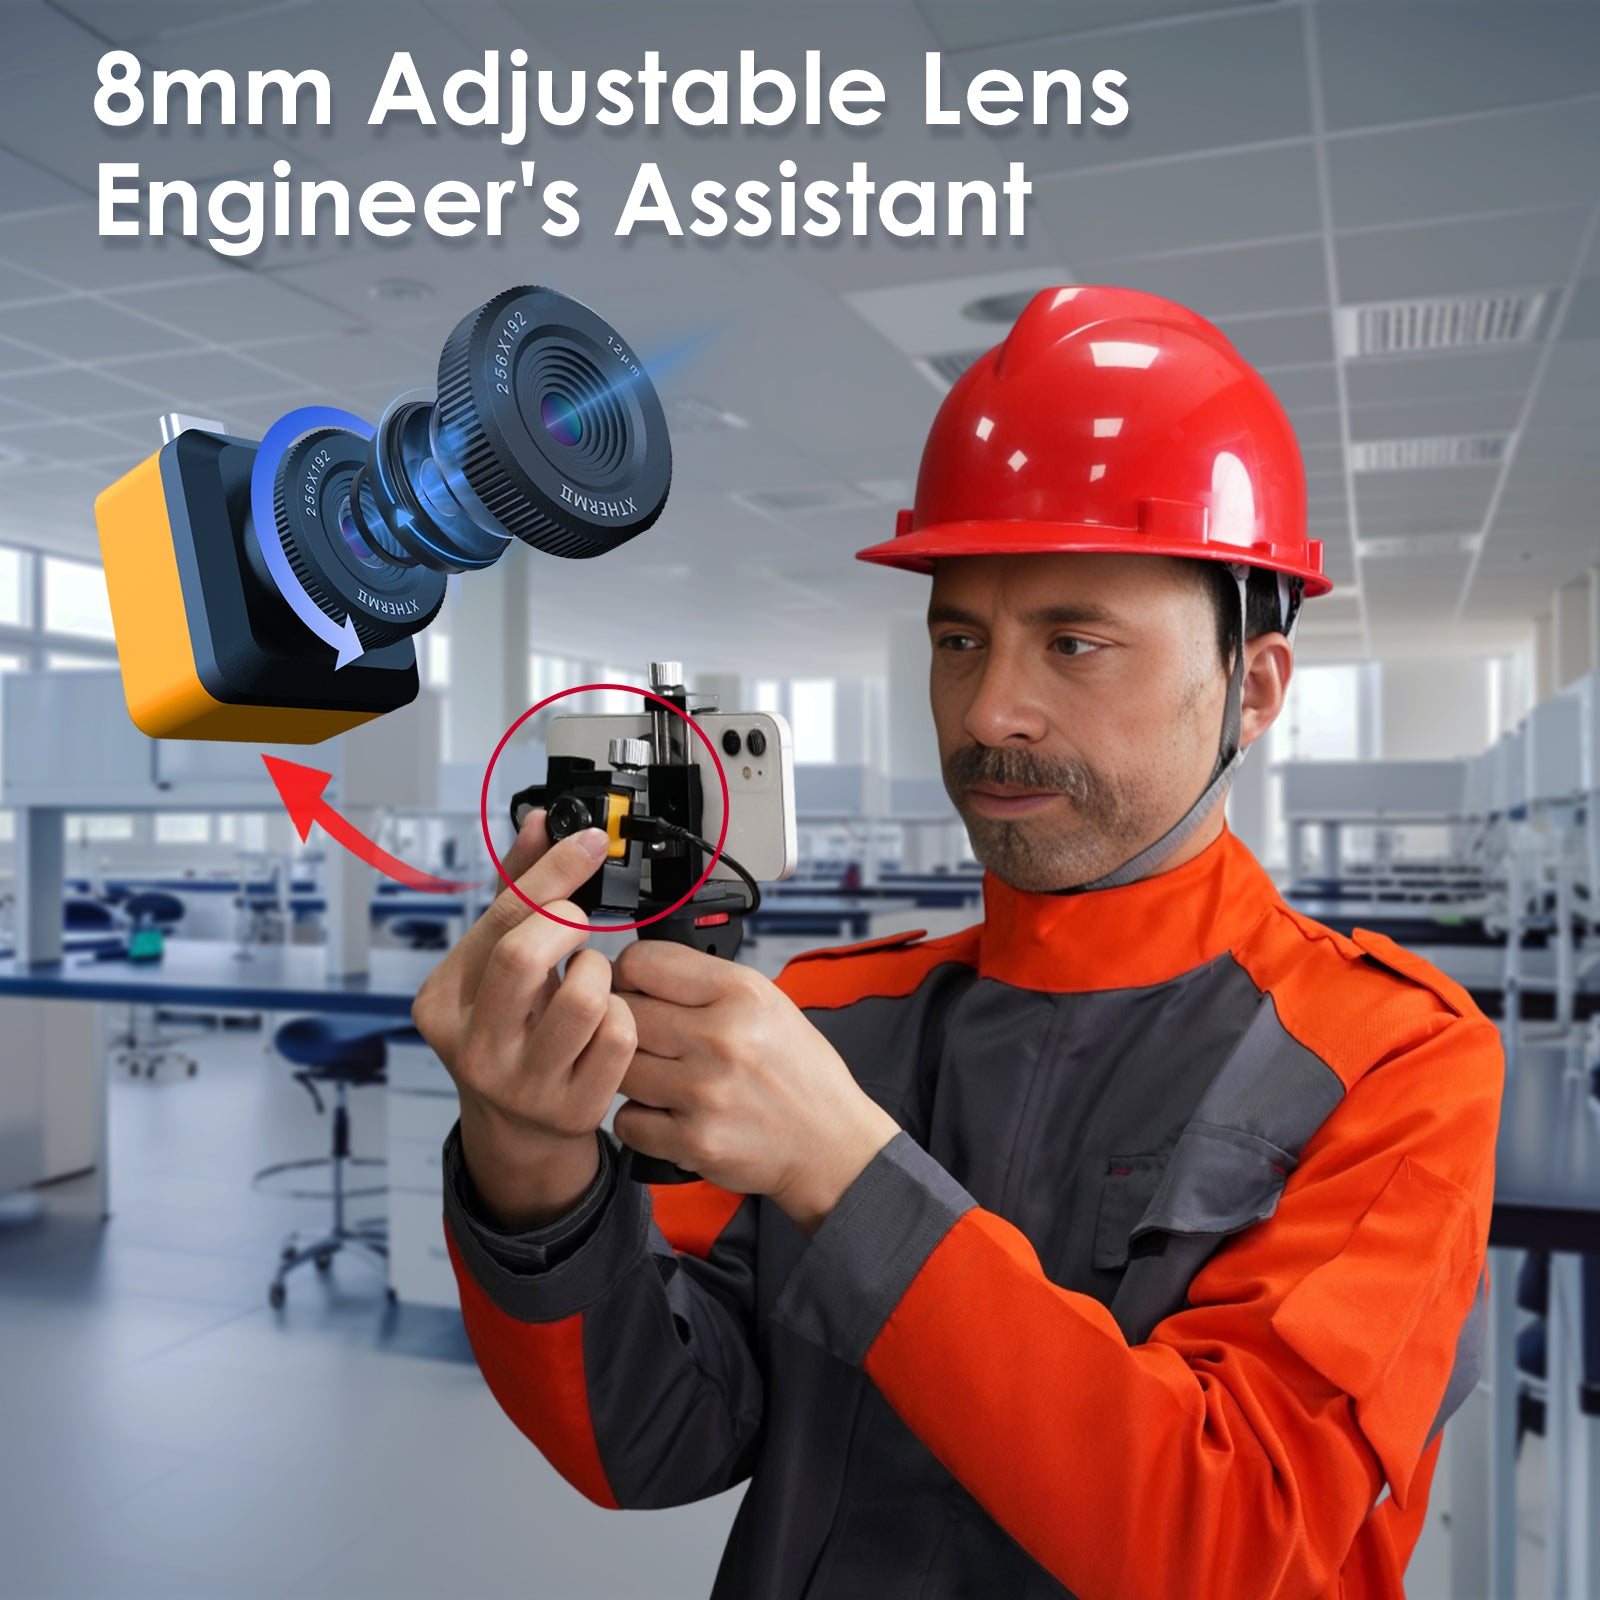
Consider the Thermal Master P1 or P3. The P1 is the budget option, still under $300, and works with any device – phone or computer. The P3 is a step up with better resolution (320×240) and manual focus, which is actually pretty useful when you’re trying to look at something up close or far away.

I keep a P3 in my garage toolbox. When I’m working on a project and want to check something – is this pipe running where I think it is, is this wall properly insulated, is this circuit breaker getting hot – I just grab my phone, pop the camera on, and I’ve got an answer in seconds.
The manual focus on the P3 is worth mentioning. Most phone cameras are fixed focus, which is fine for general scanning. But when you want to inspect something specific – like looking closely at an electrical connection or trying to see a leak that’s far away – being able to adjust the focus makes a real difference. It’s one of those features that doesn’t sound important until you need it, and then you really appreciate having it.
If You’re a Professional (HVAC, Electrical, Inspections)
This is where it gets interesting, because your needs are different. You’re not just finding problems for yourself – you’re finding problems for clients, and you need to document what you find professionally.
For HVAC and electrical work, I’d honestly still recommend starting with the P3. At under $600, it’s professional-grade without breaking the bank. The 320×240 resolution is good enough for finding and documenting problems. The manual focus helps when you’re looking at equipment at different distances. And using your phone means you can instantly take photos, add them to job tickets, email them to clients, whatever you need.
The main limitation is battery life – your phone’s battery, specifically. If you’re doing back-to-back service calls all day, you’ll probably want to keep a battery pack with you or make sure you’re charging in your truck between calls.
For home inspectors or people doing full thermal surveys of buildings, you might want to step up to something like the Thermal Master Thor. It’s a dedicated handheld unit, costs more (around $1,000-1,500 depending on model), but you get higher resolution, longer battery life, and a more rugged build. When you’re crawling around in attics and basements all day, having a purpose-built device that you’re not worried about dropping is worth the investment.
The other advantage of a dedicated unit for professional inspection work is client perception. When you show up with a professional-looking piece of equipment, clients see that you take the work seriously. It’s not a huge deal, but it does matter for building trust and justifying your rates.
How Accurate Are These Things Really?
People ask me this all the time, and the honest answer is: it depends on what you mean by “accurate.”
If you point a thermal camera at something and it says it’s 85°C, is it exactly 85.0°C? Probably not. It might be 83°C or 87°C. Most consumer-grade cameras are accurate to within plus or minus 2-3 degrees.
But here’s the thing: for most applications, you don’t need perfect accuracy. You need to know that this wire is hotter than it should be, or that this area of your wall is colder than the surrounding area, or that this section of roof is warmer than the rest. You’re looking for patterns and comparisons, not absolute measurements.
I’ll give you an example. Last summer, I was helping a friend diagnose why his air conditioner wasn’t cooling properly. I used my thermal camera to scan the outdoor unit. The supply line measured around 10°C, which seemed fine. The return line was measuring 18°C. Now, I don’t know if those temperatures were exactly right, but I could see that there was only about an 8-degree difference between the two lines. Should’ve been closer to 15-20 degrees. That told me the system wasn’t moving heat properly, which pointed to a refrigerant issue. He called an HVAC tech, they confirmed it was low on refrigerant, topped it off, problem solved.
The temperature readings weren’t perfectly accurate, but they were accurate enough to diagnose the problem.
Where accuracy really matters is if you’re using the camera for certification or compliance purposes. If you’re doing thermographic inspections that need to meet specific standards, or if you’re generating reports that might be used in insurance claims or legal situations, then you need a camera with better accuracy (usually +/- 1-2 degrees) and you need to have it calibrated regularly.
For everyone else, the accuracy on modern thermal cameras is more than good enough.
Testing Your New Camera (And Making Sure It’s Working Right)
When you get your thermal camera, spend some time just playing with it before you rely on it for anything important. Here’s what I do:
Fill a cup with hot water and another with ice water. Put them next to each other and scan them. You should see a clear, obvious difference in temperature. The hot water should read somewhere around 60-80°C (depending on how hot your tap water gets), and the ice water should read close to 0°C. If the readings are way off, or if the images look identical, something’s wrong.
Next, scan a power strip that has some devices plugged in and running. You should see slight temperature variations where the different devices are drawing power. Nothing should be alarmingly hot – if you see any spot that’s significantly hotter than others, that’s actually a problem you’ve just found.
Point the camera at yourself in a mirror. You should see your body heat clearly – typically around 32-36°C on your skin surface. Facial features should be visible (your nose is usually cooler than your cheeks, for instance). If you’re just seeing a vague blob, the resolution might be lower than what’s useful.
Go outside and look at your house or building. You should see variations where windows are (usually cooler in winter), where the sun hits walls (warmer on sunny sides), and where different materials meet (brick vs siding, for example). This gives you a baseline of what “normal” looks like so you can spot problems later.
For home inspectors or people doing full thermal surveys of buildings, following professional standards for thermal imaging helps ensure accurate results. You might want to step up to something like the Thermal Master Thor Camera.
If any of these tests reveal issues, contact the manufacturer right away. Most companies (including Thermal Master) have pretty good customer support and will help you troubleshoot or replace a defective unit.
Questions People Actually Ask Me
“Can it really see through walls?”
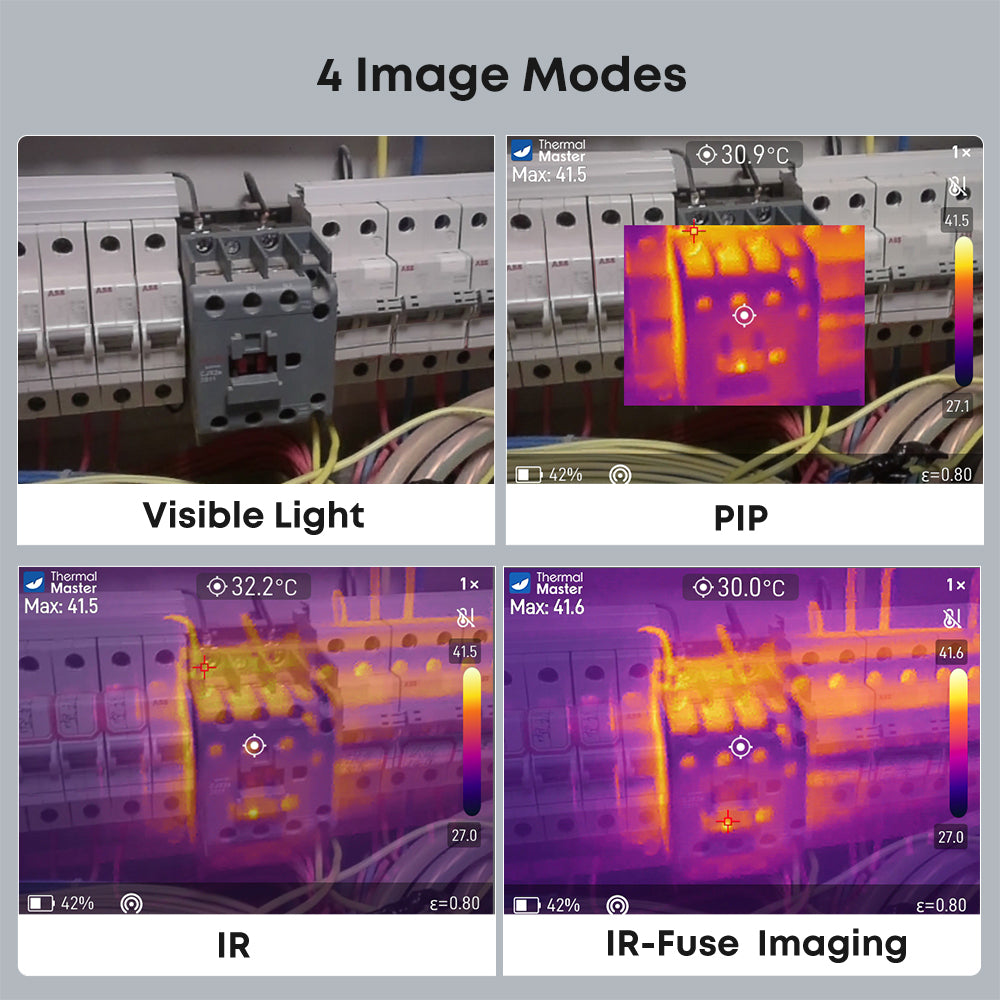
No, and anyone who tells you it can is either lying or doesn’t understand how these cameras work. What it can do is see temperature differences on the surface of the wall that tell you something’s happening behind it. So if there’s a pipe running through your wall, you won’t see the pipe, but you’ll see the wall surface where the pipe is because it’s slightly warmer or cooler than the surrounding wall.
Think of it like this: you can’t see through your bathroom mirror, but when you take a hot shower, you can see where your hand touched the mirror because of the temperature difference. Thermal cameras work on the same principle, just way more sensitive.
“Is it worth buying one if I’m just going to use it occasionally?”
I think so, yeah. Even if you only use it a few times a year, finding one problem can save you enough to pay for the camera several times over. Plus, once you have one, you’ll find yourself using it more than you expect. I thought I’d mainly use mine for finding leaks. Turns out I use it for all sorts of stuff – checking if my grill is actually preheated to the right temperature, seeing if my car’s brakes are working evenly, figuring out where my dog likes to sleep (warmest spot in the house, obviously).
The key is getting one that’s portable enough that you’ll actually grab it when you’re curious about something. That’s why I keep pushing the phone-based cameras for most people – they’re always with you.
“What about those infrared thermometers? Aren’t they basically the same thing?”
Not even close, actually. I have an infrared thermometer too (they’re like $25), and it’s useful for checking specific spots. But it only tells you the temperature of one point at a time. You have to know exactly where to aim it.
A thermal camera shows you everything at once. You can see patterns, find problems you weren’t even looking for, and understand how temperatures vary across an entire surface. It’s the difference between having a flashlight that shows you one small spot vs having room lights that let you see everything at once.
I use both, honestly. The infrared thermometer is great for quick spot checks. The thermal camera is for when I actually need to understand what’s going on.
“Do I need any special training or certification?”
Nope. Not for personal use or even for most professional applications. The cameras are pretty intuitive – point, see heat patterns, try to figure out what they mean.
That said, understanding what you’re looking at does take some practice. I’d recommend spending time just scanning random objects around your house to get familiar with how different materials show up, what normal temperature patterns look like, how distance and angle affect what you see.
For home inspectors, there are certification programs for thermal imaging, and getting certified can help you charge more and give clients confidence. But it’s not required.
“How long will it last?”
My oldest camera is six years old and still works fine. The thermal sensor itself doesn’t really wear out. The main thing that dies is the battery – rechargeable batteries typically last a few years before they start losing capacity.
For the phone-based cameras, there’s not even a battery to worry about (they use your phone’s power). The main concern is just not dropping them or getting them wet. Treat them reasonably well and they’ll last for years.
“What about those cheap thermal cameras on Amazon?”
I’ve tested a bunch of them. Some are okay as toys, but most aren’t useful for actual problem-solving. The resolution is too low, the sensors are inconsistent, and the build quality is terrible.
Here’s a rough rule: under $200, you’re probably wasting your money. Between $200-300, you can get something decent from a reputable brand like Thermal Master. Above that, you’re getting better specs and features, but the quality floor is much higher.
I know it’s tempting to save money by going with an unknown brand, but I’ve yet to find an ultra-cheap camera that was actually worth having. You’re better off saving up for another month or two and getting something that’ll actually work when you need it.
Why I Keep Recommending Thermal Master
Full disclosure here: I’m not paid by Thermal Master or anyone else. I’m recommending them because after testing a lot of different brands, they’ve consistently given me the best combination of quality and value.
The thing that impressed me most is that they actually listen to user feedback. The P2 Pro exists because people complained that the original P2 only worked with Android – they wanted iPhone compatibility. So Thermal Master made a version that works with both. That kind of responsiveness is rare.
Their customer support is also legitimately good. I’ve emailed them a few times with technical questions, and I’ve always gotten helpful responses from actual people who understand the products, usually within a day. Compare that to some other brands where you get automated responses or have to wait a week for someone to get back to you.
The 2-year warranty is longer than most competitors (who typically offer 90 days or a year), which suggests they’re confident in their build quality. I haven’t had to use it, but it’s nice to know it’s there.
And honestly, the prices are just reasonable. They’re not trying to charge $1,500 for something that costs $400 to make just because they can. The P-series cameras deliver what I’d consider professional-level results for prosumer prices.
I’m not saying they’re perfect – no company is. But for what most people need, they’ve got the right products at the right price points.
So What Should You Actually Do?
Look, I can give you all the specs and comparisons in the world, but here’s what it really comes down to: figure out what you want to use a thermal camera for, be honest about how often you’ll use it, and buy accordingly.
If you’re a homeowner who wants to check your house occasionally, get a P2 or P2 Pro. Under $400, works with your phone, does everything you need. Don’t overthink it.
If you’re serious about DIY work or you’re a pro who’ll use it regularly, step up to the P3. The extra resolution and manual focus are worth the investment. Still under $600, still connects to your phone, just better specs.
If you’re doing this professionally every single day and need a dedicated tool, look at the Thor or similar handheld units. More expensive, but built for that kind of use.
And whatever you do, don’t buy some sketchy ultra-cheap camera on Amazon because you want to save $100. You’ll end up frustrated and wishing you’d just bought something decent in the first place.
The thing about thermal cameras is, once you have one that actually works well, you’ll wonder how you ever managed without it. I use mine all the time, often for things I never anticipated when I first bought it. It’s one of those tools that really does pay for itself over time, both in money saved on repairs and in peace of mind knowing you can check for problems yourself.
Take your time, think about what makes sense for your situation, and get something you’ll actually use. That’s way more important than having the highest specs or the fanciest features.
And hey, if you have questions after you buy one, most manufacturers (Thermal Master included) are happy to help you figure out what you’re looking at. Don’t be afraid to reach out and ask. We all had to learn this stuff at some point.
Related Articles You Might Find Helpful
Using a Thermal Camera for Home Inspection
Turn Your Smartphone into a Thermal Camera